cnc radius programming
There are two main techniques that arcs or circles can be programmed using G code. They both use the G02 and G03 codes but use different values. One uses arc end points and a radius value.
The other also uses the arc end points but instead of a radius value it needs two incremental values to the arc center from the start point.
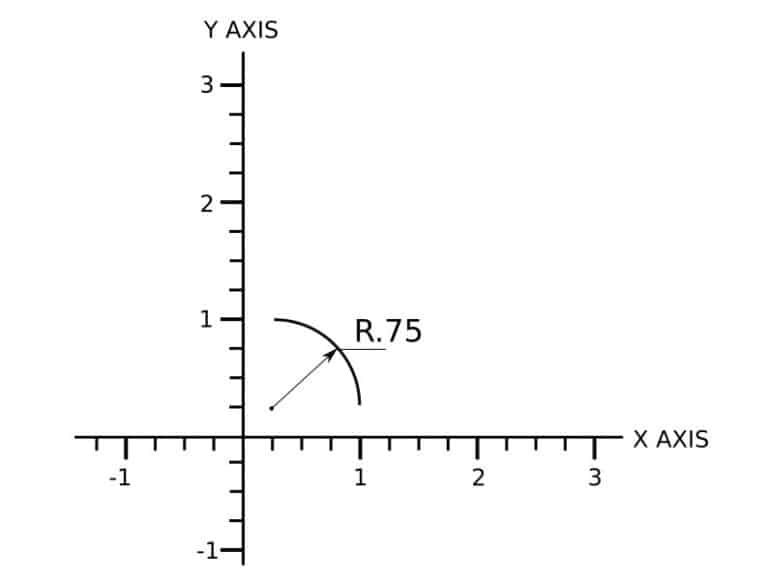
Both of the following examples of circular interpolation will create the arc shown above.
Please note that I am only showing the few lines of code that create the arc. You will still need to add a header and footer if you want a complete operating program.
I show these in my previous article, “G code programming for dummies“.
Example 1
G01 X1. Y.25 F20. (start point)
G03 X.25 Y1. R.75 (end point and radius)
Example 2
G01 X1. Y.25 F20.(start point)
G03 X.25 Y1. I-.75 J0. (end point and incremental move to arc center)
In example 2 the “I” always represents the X axis and “J” the Y axis.
Both of these snippets of code will produce the same result.
Using the Radius value is easier to understand, but the I and J method provides the software with more information as to what you are trying to achieve.
Sometimes if you use the radius value there may be more than one possible result, this can throw an error.
When trying to program an arc try both methods, if you are finding errors see which one gets the results you are looking for.
If you want to program a full circle, instead of trying to do it with one line of code, do two seperate lines of 180 degree arcs.
Trying to circular interpolate a full circle in one line of code can confuse the software into trying to go zero distance because the start and end point are at the same place.
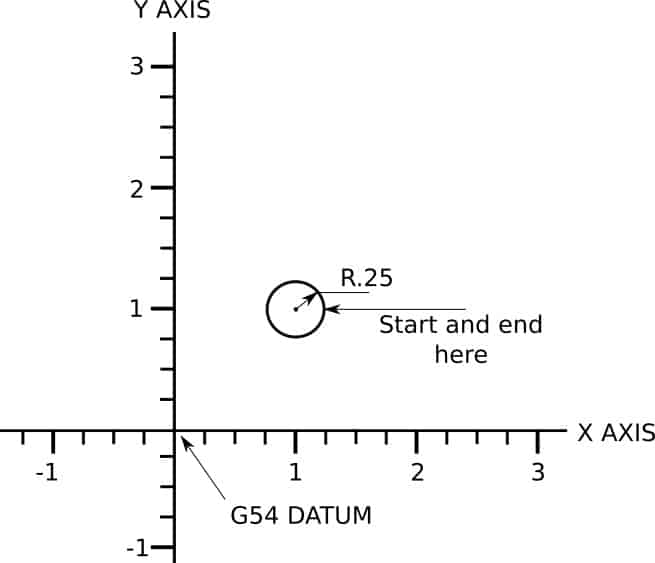
Both of these examples below represent the full circle shown above.
Example 1
G01 X1.25 Y1. (this line gives the machine a start point)
G02 X.75 Y1. R.25
G02 X1.25 Y1. R.25
Example 2
G01 X1.25 Y1. (this line gives the machine a start point)
G02 X.75 Y1. I-.25 J0.
G02 X1.25 Y1. I.25 J0.
When using the R value with circular interpolation programming you can tell the machine to do an arc of greater than 180 deg by using a minus value before it.
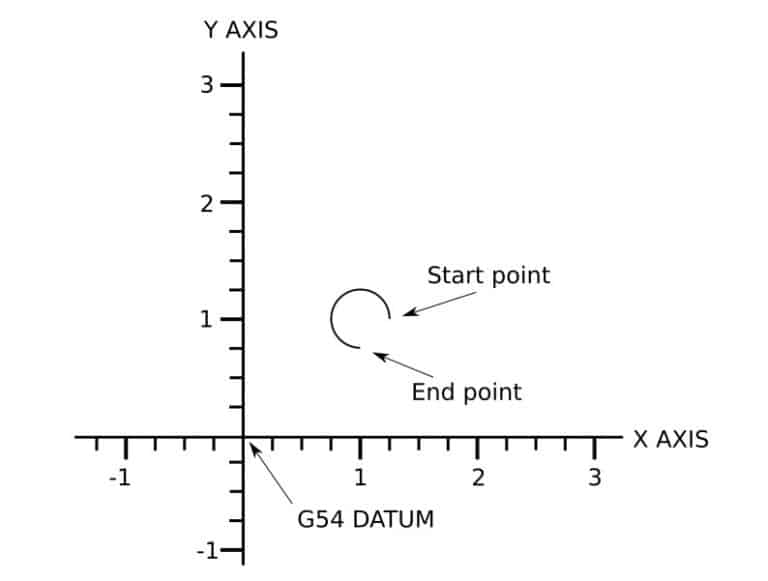
Both of the examples below represent the drawing above. These are just snippets of code they are not complete programs.
Example 1
G01 X1.25 Y1.
G03 X1. Y.75 R-.25 (minus R value)
Example 2
G01 X1.25 Y1.
G03 X1. Y.75 I-.25 J0.
Quick tip; If you can break your arcs into 90 deg segments it will make your programming easier to troubleshoot if you are having issues and the cutter paths are not behaving as you expect them to.
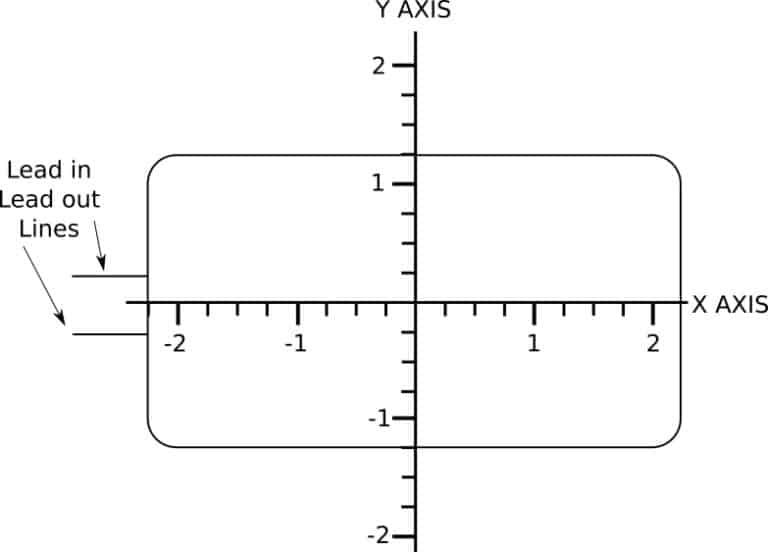
Now you can incorporate arcs with lines from the linear interpolation lesson by programming a simple rectangle with radiused corners.
%
OMILL-RECTANGLE WITH ARCS
G17 G20 G40 G49 G80 G90
T1 M06
G00 G54 X-2.6 Y-.25 S2000 M03
G43 H1 Z1.
G00 Z.1
G01 Z-.05 F1.
X-2.25 F20.
Y1.
G02 X-2. Y1.25 R.25
G01 X2.
G02 X2.25 Y1. R.25
G01 Y-1.
G02 X2. Y-1.25 R.25
G01 X-2.
G02 X-2.25 Y-1. R.25
G01 Y.25
X-2.6
G00 Z1.
M05
G91 G28 X0. Y0. Z0.
G90
M30
%
Now if you wanted to apply cutter compensation to the drawing above, the program will look like this:-
%
OMILL-RECTANGLE WITH ARCS
G17 G20 G40 G49 G80 G90
T1 M06
G00 G54 X-3. Y-.25 S2000 M03
G43 H1 Z1.
G00 Z.1
G01 Z-.05 F1.
G41 D1 X-2.25 F20. (APPLY OFFSET HERE)
Y1.
G02 X-2. Y1.25 R.25
G01 X2.
G02 X2.25 Y1. R.25
G01 Y-1.
G02 X2. Y-1.25 R.25
G01 X-2.
G02 X-2.25 Y-1. R.25
G01 Y.25
G40 X-3. (SWITCH OFF OFFSET)
G00 Z1.
M05
G91 G28 X0. Y0. Z0.
G90
M30
%
Using the program above you would enter the actual dia of your cutter in the offset page.
This will offset the cutter to produce a rectangle dimensionally correct to the programmed size.
helical interpolation program example
Being able to mill a circular pocket is a very useful technique to learn and is pretty much the same as the examples already shown in this lesson but with a Z axis move thrown in.
This line can then be copied and pasted as many times as you like. Then you will have to change the Z axis value on each line…
Here is an example drawing of a circle to demonstrate a few G code programs

This program has been written using two lines of code for each complete revolution. It ramps down in the Z axis .02” per half revolution, so .04” total per revolution.
I’ve added a G41 for a tool offset, so this will mill a 2” dia circle if you input your correct tool diameter in the offset page.
%
OMILL-RAMP
G17 G20 G40 G49 G80 G90 (SAFETY LINE)
T1 M06 (TOOL CALL)
G00 G54 X0. Y0. S2000 M03 ( PRE POSITION AT START OF LEAD IN LINE)
G43 H1 Z1. (MOVE TO Z SAFE POINT)
G00 Z.1 (RAPID TO .1” ABOVE Z ZERO)
G01 Z0. F2. (FEED DOWN TO Z0.)
G01 G41 D1 X1. Y0. F20.
G03 X-1 Y0. I-1. J0. Z-.02
X1. Y0. I1. J0. Z-.04
X-1 Y0. I-1. J0. Z-.06
X1. Y0. I1. J0. Z-.08
X-1 Y0. I-1. J0. Z-.1
X1. Y0. I1. J0. Z-.12
X-1 Y0. I-1. J0.
X1. Y0. I1. J0.
G01 G40 X0. Y0.
G00 Z1. (MOVES AT RAPID TO SAFE Z)
M05 (SPINDLE OFF)
G91 G28 X0. Y0. Z0. (MOVE TO HOME POSITION)
G90 (RE-ESTABLISH ABSOLUTE PROGRAMMING)
M30 (FINISH PROGRAM, REWIND AND STOP)
%
Another way of achieving the same result is by using a G91 incremental move.
The only advantage is that you will not have to change the Z value for each line you copy and paste to reach your required depth.
I don’t generally recommend using incremental moves in a program it can be confusing and you have to be very careful when you make changes.
But if you are careful they can be useful, so here is an example.
%
OMILL-RAMPING CIRCLE
G17 G20 G40 G49 G80 G90 (SAFETY LINE)
T1 M06 (TOOL CALL)
G00 G54 X0. Y0. S2000 M03 ( PRE POSITION AT START OF LEAD IN LINE)
G43 H1 Z1. (MOVE TO Z SAFE POINT)
G00 Z.1 (RAPID TO .1” ABOVE Z ZERO)
G01 Z0. F2. (FEED DOWN TO Z0.)
G01 G41 D1 X1. Y0. F20.
G91 G03 X0. Y0. I-1. J0. Z-.02
X0. Y0. I-1. J0. Z-.02
X0. Y0. I-1. J0. Z-.02
X0. Y0. I-1. J0. Z-.02
X0. Y0. I-1. J0. Z-.02
X0. Y0. I-1. J0. Z-.02
X0. Y0. I-1. J0. Z-.02
X0. Y0. I-1. J0. Z-.02
X0. Y0. I-1. J0. Z-.02
X0. Y0. I-1. J0. Z-.02
X0. Y0. I-1. J0. Z-.02
X0. Y0. I-1. J0. Z-.02
X0. Y0. I-1. J0. Z-.02
X0. Y0. I-1. J0. Z-.02
X0. Y0. I-1. J0. Z-.02
X0. Y0. I-1. J0. Z-.02
X0. Y0. I-1. J0. Z-.02
X0. Y0. I-1. J0. Z-.02
X0. Y0. I-1. J0. Z-.02
X0. Y0. I-1. J0. Z-.02
X0. Y0. I-1. J0. Z-.02
X0. Y0. I-1. J0. Z-.02
X0. Y0. I-1. J0. Z-.02
X0. Y0. I-1. J0. Z-.02
X0. Y0. I-1. J0.
G90 G01 G40 X0. Y0. (G90 TO RE-ESTABLISH ABSOLUTE PROGRAMMING)
G00 Z1. (MOVES AT RAPID TO SAFE Z)
M05 (SPINDLE OFF)
G91 G28 X0. Y0. Z0. (MOVE TO HOME POSITION)
G90 (RE-ESTABLISH ABSOLUTE PROGRAMMING)
M30 (FINISH PROGRAM, REWIND AND STOP)
%
You may have noticed that the last complete revolution of each program has no Z axis depth, this is just to produce a flat bottom on the pocket.
If you want to learn more about programming arcs I recommend doing an online course.
Udemy have quite a few courses to choose from including ‘Foundation to Cnc Programming using GCode‘ , which covers a lot of the basic programming processes.
G codes
- G00 = rapid movement
- G01 = move at the specified feedrate
- G02 = clockwise arc or circle movement
- G03 = counter clockwise arc or circle movement
- G17 = X Y plane selection
- G20 = coordinates in inches
- G21 = coordinates in MM
- G28 = home position return
- G40 = cutter compensation cancel
- G41 = cutter compensation left
- G42 = cutter compensation right
- G43 = tool length compensation on
- G53 = cancel work offsets
- G54,G55,G56,G57,G58 and G59 = work offsets
- G80 = cancel canned cycle
- G81 = basic drilling canned cycle
- G83 = peck drilling canned cycle
- G90 = absolute programming
- G91 = incremental programming
M codes
- M00 = program stop
- M01 = optional stop
- M03 = spindle on
- M05 = spindle off
- M06 = tool change
- M30 = end of program, rewind and reset
- M97 = subroutine call
- M98 = subprogram call
- M99 = subprogram end
Take a look at a full list of all the articles on this website, see what other Cnc topics I can help you with.