G Code Programming for Dummies
Basic cnc programs are not too difficult to do. A hobbyist Cnc operator should not have any difficulty in learning how to write simple G code programs.
I say “basic” because you will need to decide when it will be easier or quicker to create a Cnc Project in a cad/cam program than it will be to write your own cnc G code. This will depend on how much practice you have had and whether you even enjoy writing them.
It is definitely an advantage to know how to read and write G code as it will make improving your cnc programs so much quicker and easier.
It will also enable you to analyse and edit programs that have been created by CAM software.
G-code programming uses set codes with letter prefixes before numbers. Each code will tell the machine to execute a different process.
Some of these commands are used in conjunction with coordinates to tell the machine to travel to the given points.
There are a lot of G and M codes, but running a hobby machine you will only need to learn a handful of them. I have listed the codes you will most likely need below.
The G-codes that are marked with an * are used in conjunction with coordinates.
G codes
- G00 = rapid movement
- G01 = move in a straight line at the specified feedrate*
- G02 = clockwise arc or circle movement*
- G03 = counter clockwise arc or circle movement*
- G04 = Dwell
- G17 = X Y plane selection
- G18 = X Z plane selection
- G19 = Y Z plane selection
- G20 = coordinates in inches
- G21 = coordinates in MM
- G28 = home position return*
- G40 = cutter compensation cancel
- G41 = cutter compensation left
- G42 = cutter compensation right
- G43 = tool length compensation on
- G53 = cancel work offsets
- G54,G55,G56,G57,G58 and G59 = work offsets
- G73 = High Speed Peck drilling canned cycle*
- G80 = cancel canned cycle
- G81 = basic drilling canned cycle*
- G83 = peck drilling canned cycle*
- G84 = Tapping cycle*
- G90 = absolute programming
- G91 = incremental programming
- G98 = Canned cycle retract distance
- G99 = Canned cycle retract distance
M codes
- M00 = program stop
- M01 = optional stop
- M03 = spindle on, clockwise
- M04 = spindle on, counter clockwise
- M05 = spindle off
- M06 = tool change
- M07 = Coolant Mist on
- M08 = Coolant on
- M09 = Coolant off
- M30 = end of program, rewind and reset
- M97 = subroutine call
- M98 = subprogram call
- M99 = subprogram end
In my article “G28 G code demystified” I explain program headers and footers. You can use these for every program you write, just copy and paste whenever you need to write a new program.
I keep a selection of basic programs that I can copy and edit, it makes the process of writing a new program really quick.
Cnc program Header
% (Identifies the start of the program)
ODRILL (program name)
G17 G20 G40 G49 G80 G90 (safety line establishing important G codes)
T1 M06 (Tool call and tool change commands)
G00 G54 X0. Y0. S2000 M03 (X and Y pre-position line)
G43 H1 Z1. (Tool length offset command and Z pre-position line)
Cnc program Footer
G00 Z1. (move up in Z 1” above the Z datum)
M05 (stop the spindle)
G91 G28 X0. Y0. Z0. (rapid move to home position)
G90 (re-establish absolute programming mode)
M30 (finish program and rewind to the beginning and stop)
% (identifies the end of the program)
Here are the header and footer together without the explanations in brackets. You can copy and paste these into a text editor for the basis of a program template.
%
ODRILL
G17 G20 G40 G49 G80 G90
T1 M06
G00 G54 X0. Y0. S2000 M03
G43 H1 Z1.
(insert the main program here)
G00 Z1. M09
M05
G91 G28 X0. Y0. Z0.
G90
M30
%
Now we can move on and do a simple drilling program using the header and footer.
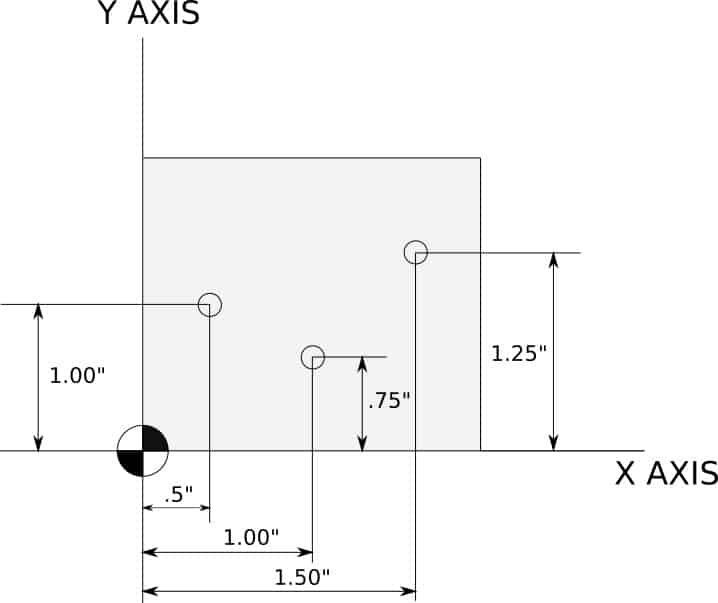
From the drawing above we can see there are 3 holes that need drilling. All we need to do is add a drilling cycle with 3 locations in between the header and footer.
I am going to program a spot drill cycle first, prior to a peck drilling cycle with a drill bit.
We can use a G81 drilling cycle for this :-
E.g. G81 Z-.02 R.1 F2.
The Z value specifies the depth to go to, the R value specifies at what Z height to start moving at the feed rate. The F value is the feed rate in inches per minute.
The G81 canned cycle is a modal command, this means it will stay active until cancelled.
So on the next lines you only have to specify where else you need to apply that drilling cycle and the machine will continue drilling at the listed positions.
G81 Z-.02 R.1 F2.
X1. Y.75
X1.5 Y1.25
G80 (cancel canned cycle)
So the full program will look like this:-
%
ODRILL
G17 G20 G40 G49 G80 G90
T1 M06
G00 G54 X.5 Y1. S2000 M03
G43 H1 Z1.
G81 Z-.02 R.1 F2.
X1. Y.75
X1.5 Y1.25
G80
G00 Z1.
M05
G91 G28 X0. Y0. Z0.
G90
M30
%
You may have noticed that there are only 2 positions after the G81 command even though we need to drill 3 holes. This is because the machine will drill its first hole at the position it is already at.
If you look at the G code line “G00 G54 X.5 Y1. S2000 M03” you can see that the machine was initially positioned at the first hole. It will drill there first and then continue with the remaining two positions.
Now we have applied the spot drill cycle all we have to do is copy and paste the program and change the G81 canned cycle to a G83 peck drilling cycle, changing the Z depth to how deep the drill needs to go.
The G83 line will look like this:-
G83 Z-.5 R.1 Q.05 F2.
The Z value has been changed to the depth the drill needs to go and a Q value has been added to the line.
The Q value specifies the peck depth.
This means the drill will retract to clear the chips after the specified Q value has been reached. It will repeat this pecking process until the final depth is reached.
The full drilling program will now look like this:-
%
ODRILL
G17 G20 G40 G49 G80 G90
T1 M06
G00 G54 X.5 Y1. S2000 M03
G43 H1 Z1.
G83 Z-.5 R.1 Q.05 F2.
X1. Y.75
X1.5 Y1.25
G80
G00 Z1.
M05
G91 G28 X0. Y0. Z0.
G90
M30
%
I will go through the program line by line now to make sure there isn’t anything about the program that is not explained fully.
%
The % signs identify the beginning and end of the program and are only needed for some cnc control software programs.
ODRILL
The letter O always precedes the program name enabling the cnc control software to identify the program. It is not required to include the program name, you could just put the name in brackets for your own identification.
Speaking of brackets, anything you type inside them will get ignored, which means you can fill your program with notes and reminders.
G17 G20 G40 G49 G80 G90
This next line is the safety line, it makes sure all the important G codes are reset before the program is run.
Some software limits the amount of G codes allowed for one line, so if the program stops and shows an error this line can be split into two.
T1 M06
This line tells the software which tool to call and to change to that tool. Most hobby mills do not have a tool changer so the M06 command is not needed but the software will just ignore it and continue.
G00 G54 X.5 Y1. S2000 M03
The G00 tells the machine to move at rapid, pick up the offsets stored for G54, move to the first hole position and turn on the spindle.
Specifying the 2000 rpm spindle speed is not necessary if your machine is not equipped with a controllable variable speed spindle. I leave it in to remind me what speed to set the machine at.
G43 H1 Z1.
This line sets the tool length compensation stored in H1 and moves the tool to 1” above the G54 Z axis zero height.
G83 Z-.5 R.1 Q.05 F2.
The G83 calls the peck drilling canned cycle, the Z value is the final depth, the R value is the Z height it starts drilling at, the Q value is the peck depth and the F is the feed rate in inches per minute.
X1. Y.75
X1.5 Y1.25
These next two lines are the two remaining hole positions, the machine will continue using the G83 drilling cycle until it is cancelled with a G80.
G80
Cancels the G83 peck drilling cycle.
G00 Z1.
The tool will now move to 1” above the Z datum at rapid speed.
M05
Turns off the spindle.
G91 G28 X0. Y0. Z0.
Sends the tool back to the machines home position.
G90
Resets the G91 from the previous line back to Absolute programming.
M30
end of program, rewind to beginning and reset.
If you are interested in furthering your programming skills I can recommend learning from an online course.
Udemy have quite a few to choose from including ‘Foundation to Cnc Programming using GCode‘ , which covers a lot of the basic programming processes.
Learning the basics of programming could be the first step to a career as a cnc operator. If you would like to earn a living as a Cnc Machinist check out the Jooble online job listings. You just might just find your next career!


