One of the best abilities of the 3018 Cnc are it’s dual functions of machining and laser engraving. The blue laser module kit is available from sainsmart to upgrade your spindle engraver to a small Laser engraver/cutter.
A Laser Module for a Desktop cNC
There are two power versions available, 5.5watt and 2.5watt, both versions being physically identical, the 5.5w versions do cost more though.

If you don’t already own a 3018 cnc there is a machine available with both a spindle and laser included.
[amazon box=”B07X3F8878″ price=”hide” title=”Cnc 3018 pro 3 axis router with 5.5W laser Module” description=”Designed for the absolute beginner, this machine is a great tool for starting CNC learning. It come with the spindle motor and 5.5W Laser module on Z axis”]
There are also dedicated cheap laser engravers available like the one shown below.
[amazon box=”B08CBTYLB4″ price=”hide” title=”ORTUR Laser Master 2, Laser Engraver” description=”Designed just for Laser Engraving”]
All 3018 cnc engravers have the plugs for the laser module built into the control boards making the conversion a simple plug ‘n’ play option.
This upgrade is a diode laser which is the least powerful type of laser but a lot more durable and less complicated to use than the more powerful CO2 lasers. This makes them ideal to use at home in a small workshop.
If you are not familiar with what laser engravers can do, they can be used to cut out shapes in soft materials such as wood, card, leather etc.
They are also used to burn images on these same types of materials. The laser does this by using less power to change the strength of the laser to achieve a greyscale type of image.

In the box you get a laser enclosed in a large heatsink with a cooling fan on top, a power supply, connecting cables, safety glasses, mounting hardware for the power supply and an instruction booklet.

Mounting the laser is really simple, once you have disconnected and removed the spindle motor, the heatsink slides into the notches inside the spindle mount.

The power supply is attached to the back of the X axis cross member next to the control board using the supplied t-nuts and hex bolts.


Once the hardware is mounted the instructions suggest you download and use free software called ‘laserGRBL’. This is basically the laser equivalent of Candle or USG.

The added bonus of this software compared to Candle and USG software is its ability to create G Code (For Laser only).
Getting started with Laser engraving is a lot easier than machining!
LaserGRBL is available here https://github.com/arkypita/LaserGRBL/releases/tag/v4.2.1
I downloaded V4.2.1 and it installed with no issues on my windows10 pc. I have a LaserGRBL tutorial here.
There are a couple of settings that need to be changed to get the machine connected to LaserGRBL. The first is to set the correct COM port and Baud rate. If you have already run your machine with the spindle attached these settings will be the same as when connected to Candle or UGS.
Your machine needs to be connected and powered up so that the software can detect all the available COM Ports and make them available to select.
The next important setting is GRBL firmware setting $32.
This setting is written to the control board’s firmware. It tells the machine whether it is operating a rotating spindle or a laser.
$32 = 0 is for a rotating spindle.
$32 = 1 is for a laser.
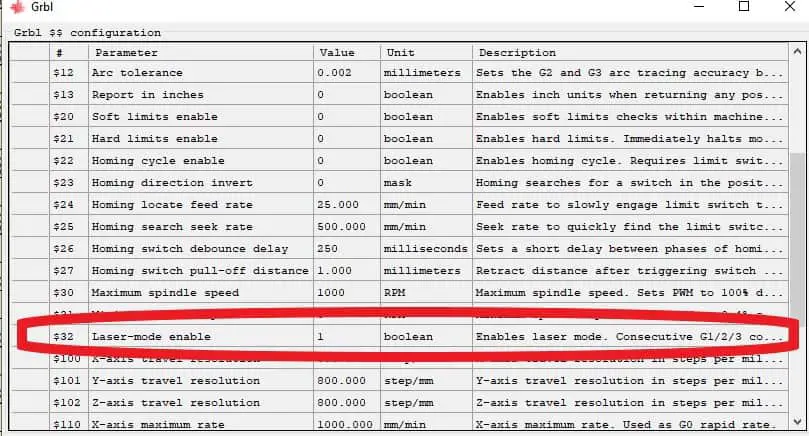
With the setting at 1, the software will switch the Laser off when executing a rapid move. This prevents your project getting crisscrossed with unwanted laser cuts. Unlike a spindle which keeps rotating and is just lifted clear of the part to execute its rapid moves.
This will have to be switched back to 0 when reattaching the spindle motor, otherwise your spindle will keep switching off and on while running programs.
If you are following the provided instructions the next task is to enable the Z axis jog. Dedicated laser engravers may not be equipped with a Z axis so LaserGRBL only has this as an option and it needs to be activated.
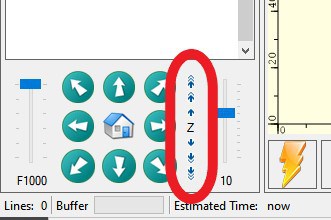
All this allows you to do is to manually move your Z axis to maintain the focal length of the laser to the top of your work piece. To activate the Z axis commands in the user interface, select the ‘jog control’ tab in the settings and check the ‘show Z up/down control’ box.
The Z axis control will now show up next to the jog buttons.
Sainsmart also provides some custom buttons to download and install into LaserGRBL to provide convenient ‘shortcuts’. I installed these to see if they were useful.

These buttons include a ‘Laser Mode On’ button, which switches on the $32=1 firmware setting on your control board. The other two turn the laser on at low power for focusing (the big eye) and for checking your datum position. The latter option turns the laser on for 2 seconds only.
These custom buttons can be downloaded from here.
The next task is focusing the laser. The instructions recommend setting the bottom of the laser heatsink body 60mm above your workpiece. This is simply done by jogging the Z axis down (or up) and setting the height. I used a steel rule.
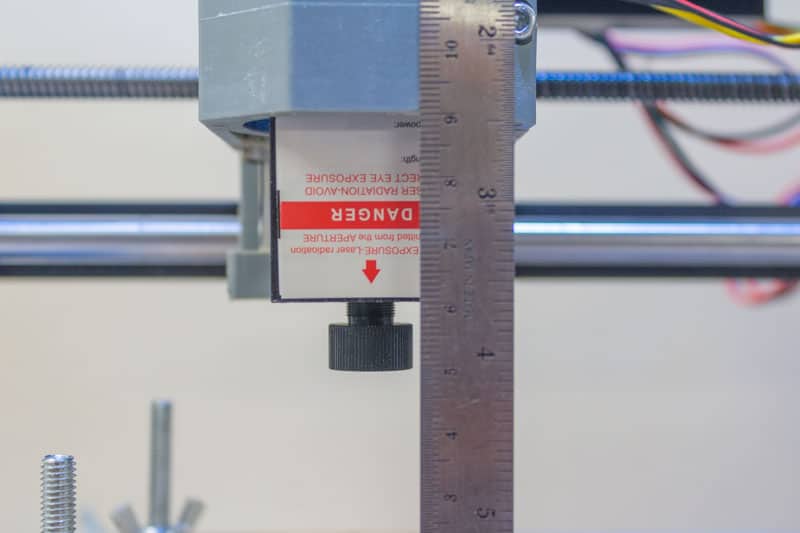
Then turn on the laser at low power using the custom button that was just installed, you can turn the focus knob until the laser is a small dot on the test workpiece.
Now all you have to do before using the laser is to jog the Z axis to 60mm above the workpiece and the laser will be focused.
Laser Test Runs
All that remains is to give the Laser some test runs to see what it can do. I downloaded a jpeg of a tree, fiddled with a few settings and got a pretty good result.

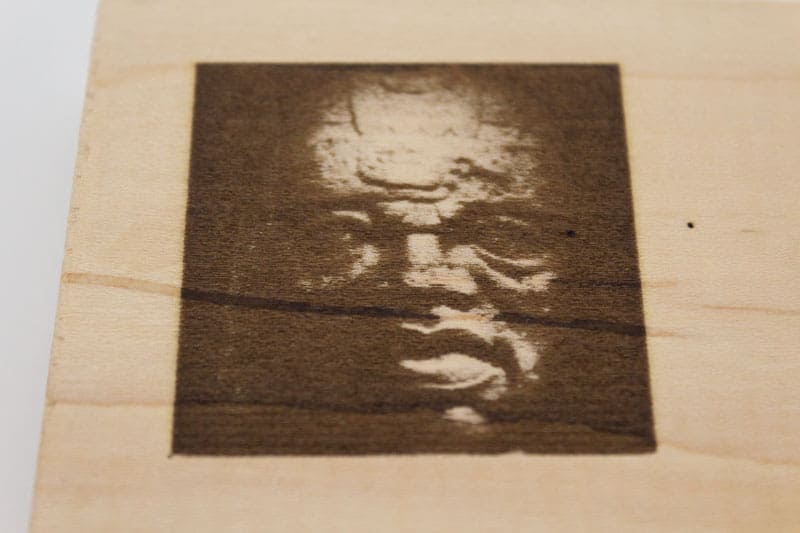
Next I tried a dark image of an Olmec statue. My first attempt was not very good, it was too dark.

Adjusting the brightness and contrast settings gave me a better result, along with increasing the number of passes per mm.
What I was eager to try though was cutting out contours. I did a quick test with some balsa wood using a jpeg of a gear. The contour was created using the vectorize function.
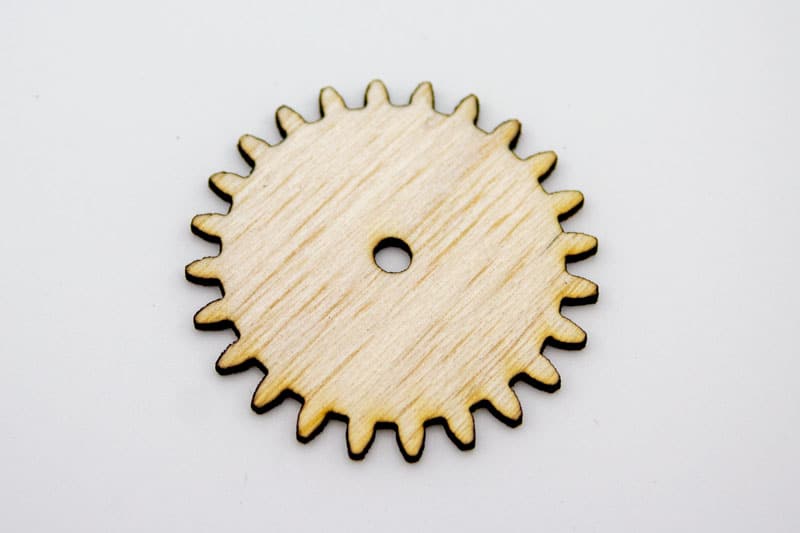
It wasn’t a perfect shape because I used a jpeg and let the software create its own path but it let me do a quick test to try out different settings and speeds.
How do you Control the Laser Power?
The difference between engraving and cutting is a combination of laser power and feedrate.
When engraving a picture less power is needed and the feedrate can be higher. The grayscale gradients on engravings are achieved by the laser power being changed as it moves.
The power is controlled by the S value in the G code. So instead of controlling spindle speed the Laser power is changed. This results in lots of S values in your G Code programs.
For Laser cutting, the power is constant, higher for thicker or tougher materials. Also if full power is not enough to cut through the material the feedrate can be reduced to give the laser more time to penetrate.
If the feedrate is slow and the part burns too much the feedrate can be increased and multiple passes can be used to gradually cut through the part. This is similar to multiple cut depths when machining (peck depths).
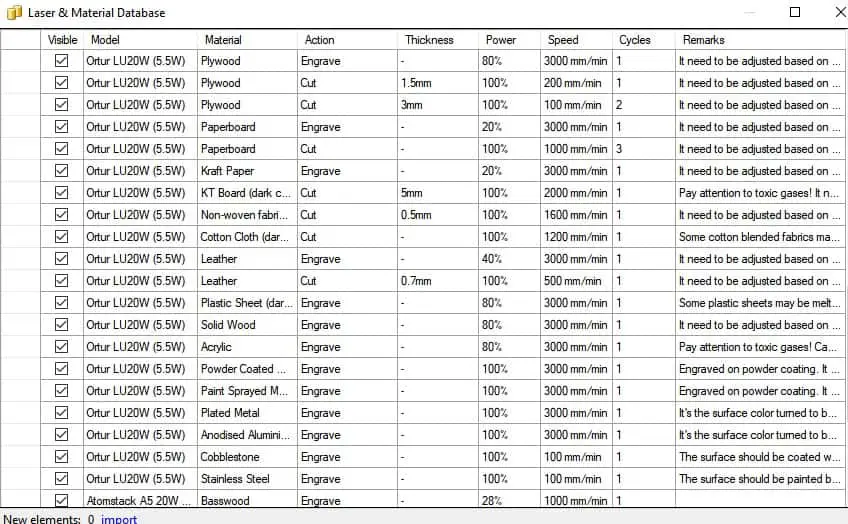
There is a useful material database in LaserGRBL which gives you some good starting values for your Laser power and feed rates for different materials.
Conclusion
Adding this Laser module to your machine will increase your options for creating projects. Engraving your work can really add that personalized finishing touch. I really can’t see any disadvantage to buying one for creative reasons.
The only downside I found to using a laser is the smoke and smell. Engraving or cutting wood can create quite a lot of smoke so you do need to have some type of ventilation.
You can end up smelling like you’ve been sitting around a campfire all evening, don’t run it in your living room unless you live alone!

