What are limit switches used for?
Limit switches are used to prevent a machine from running into the end of its travel and getting damaged. On a small hobby mill, limit switches can also be used for homing a machine at its ‘machine reference point’.
cnc mill without limit switches?
When working with home based cnc machines such as routers and desktop mills I often see questions on internet forums about homing switches. Do you need them? How to set them up? Can you run a machine without them?
This article will answer all these questions and more… well maybe not more, but I will explain what I do and why I don’t use them on my taig desktop cnc mill.
The great limit switch debate
I am sure that somewhere on the internet at any given time there will be several people having a discussion on the need for limit switches on a hobby cnc machine.
Simply put, if your machine did not get delivered with them it does not need them to operate.
Every machine I have run in my career as a machinist has had limit switches built into it. The difference with these “industrial” machines is that the software is designed to use them and they are essential for it to operate correctly.

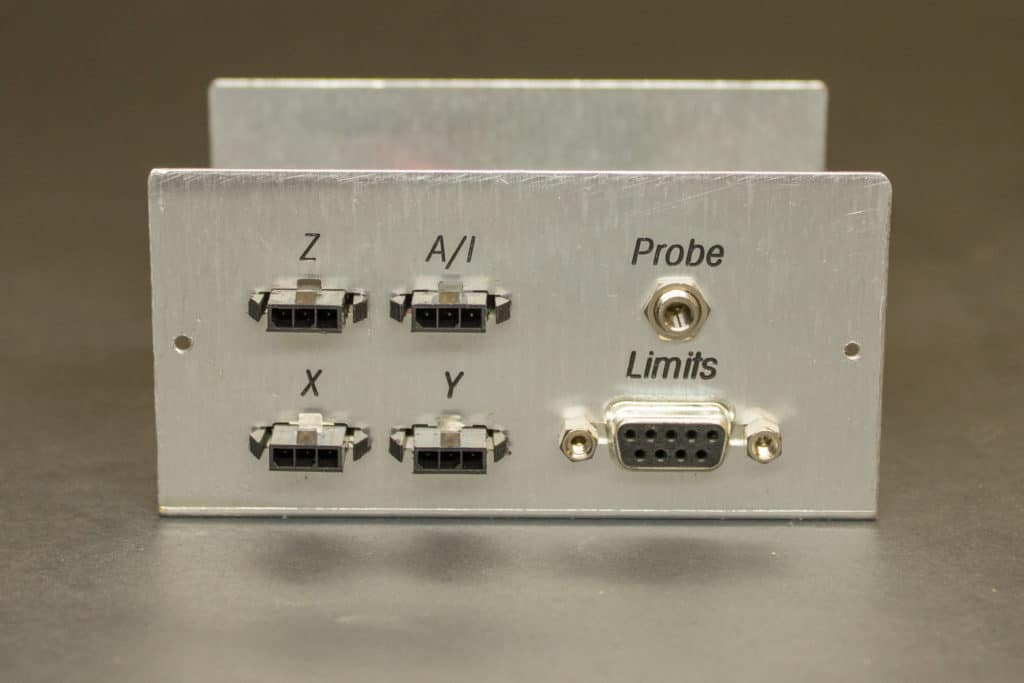
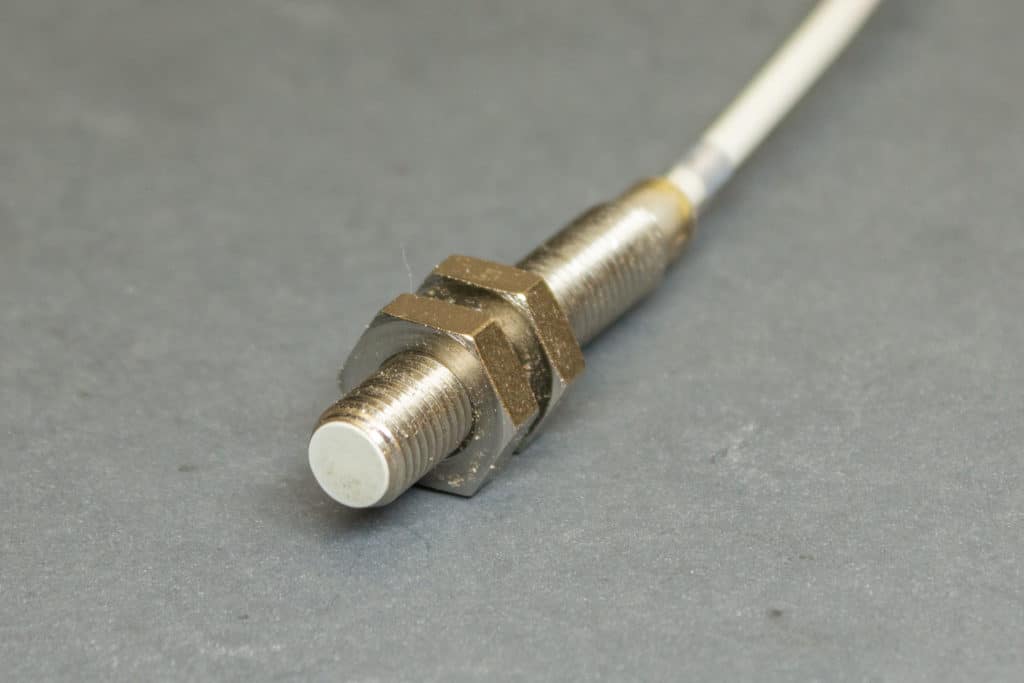
When I ordered my Taig cnc desktop mill I added some limit switches to my order thinking I would need to use them as homing switches.
After setting up my machine and getting used to how it operates with Mach 3 software I quickly realised they were not necessary.
In fact they would probably be an extra hassle if they malfunctioned and also they would need to be kept clear of chips and dirt. Also there is very little room to mount them and in comparison to the size of the machine they are huge.
Basically they would look terrible and I had my doubts as to how accurate they would be. The main reason I wanted them was so I could leave a part unfinished, switch the machine off, then switch it back on and be able to finish the part without any mismatch issues.
I soon realised a more reliable way of homing the machine existed and it did not need limit switches to work.
Set your home or reference position
Most software I have researched for home use, will locate the reference position at the point it is at when you start the machine up.
Therefore, if you want to keep the reference point the same every time you operate the machine you need to return it to that position before you switch off the machine.
First off, manually move your machine to where you want the home position to be. I moved all three of my axes in the positive direction to just before they would hit the limit of their movement.
Then you can simply switch the machine and software off and back on again.
All you have to do now is to home the machine at the end of every program you run.
Simple.
To home the machine you can add the G28 code just before the M30 or M01 like this:-
G91 G28 Z0.
G28 X0. Y0.
G90
M30
If you need the G28 code explaining in more detail you can check out my article, “G28 G code demystified”.
Will using limit switches prevent a crash?
When I say crash, I mean over run the limits of the machines travel in any of its axes. Doing this could cause damage to the machine or at least cause it to lose steps and need the machine reference position re-establishing.
Yes, limit switches will prevent your machine trying to twist itself to pieces.
I also believe that limit switches are not specifically designed to establish the home position although they can be used to do both jobs.
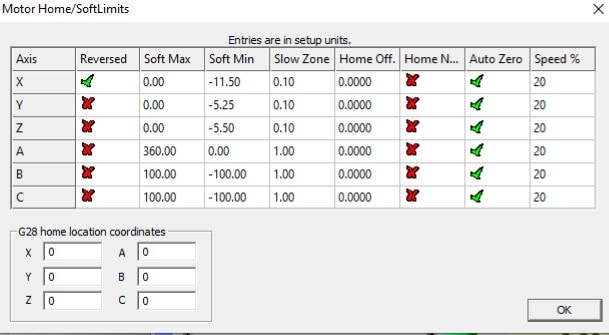
I never did install the limit switches I ordered because the mach3 software I use has a feature called “soft limits”. This enables you to set up virtual limit switches that are referenced to the machine home position.
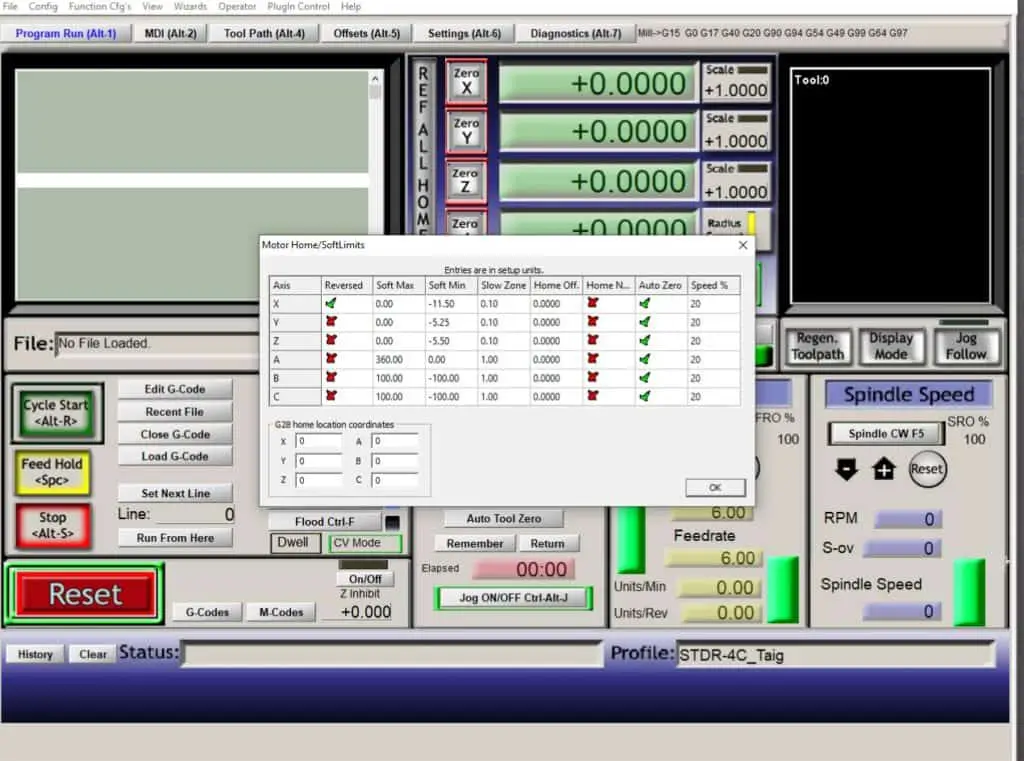
To access this feature go to the “config” menu, then select “homing/limits”. A table will appear where you can set your distances in each axis from the reference position.
All I do is manually jog the machine to the extreme travel distance of each axis and enter that amount in the appropriate column in the table. I would reduce the distance approx 0.1” so it doesn’t stop too close.
There is also a “slow zone” column in the table which gives a distance away from the limits where the machine will slow down by a percentage of the feed rate. This amount can be entered in the “speed%” column.
Once you have your distances set in the “homing/limits” table, you will need to switch on the “soft limits” switch on the program run page. The border of the “soft limits” switch will turn green when it is active.
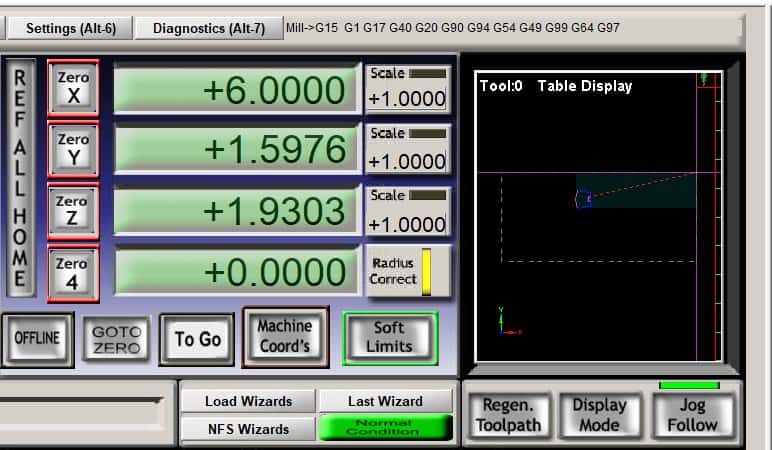
Then you will need to toggle the “display mode” button to switch on the table display in the graphics window.
The work area will show up as a white dashed line.
Now when you load a program the graphics window will display the tool paths, enabling you to check that the program stays within your work area.
With the soft limits now active you will be prevented from manually moving your machine up against its “hard limits” preventing any accidental damage.
If you try to run a program that goes outside of the soft limit range the software will give you a warning asking you if you want to continue.
This would be a good time to check your program and correct any toolpaths that are exceeding your limits.
Do I recommend you buy a limit switch set for your machine?
There is certainly nothing wrong with using them, if your machine is big enough to accommodate them they are an extra safety measure. You will also be able to use the software’s homing function and use them as homing switches.
When you do crash into your part, (because you will), you will still have to check or reset your part datums because it is likely something will have moved. It makes no difference if you are using digital soft limits or physical limit switches.
It still sucks.


