Before I go into detail about the Mach3 user interface with this Mach3 Cnc software tutorial, I want to address a few commonly asked questions about this software.
What is Mach3?
Mach3 is a popular Cnc control software that is available for download to use on windows computers. This makes it an ideal option for the D.I.Y. Cnc enthusiast to control a small milling machine or router.
Will mach3 run on windows 10?
Mach3 will run on windows 10. I have been using windows 10 for a while and I have had no issues.
What is the latest version of Mach3?
At the time of writing the latest version of Mach3 is V3.043.
One point to note is that updates to this software usually relate to fixing bugs and software conflicts.
So if you have an earlier version that runs well, with no issues, I would advise you to not upgrade to the latest version.
How Do I use Mach3 Software?
Well this is a big question that relates a lot to ‘How do I run a cnc machine?’.
If you have run a cnc machine before, but not using Mach3, you will find it quite intuative and really easy use.
However there are a few quirks that will be different to other cnc control software.
Hopefully the following tutorial will answer a lot of questions you may have about using it to run your Cnc Machine.
I should probably explain here that Mach3 software does not create G code programs, it only runs them and sends commands to the machine.
There is a link at the bottom of this article to a G Code creation tutorial.
Mach3 Tutorial
In this tutorial I will be going through all the main screens on Mach3 that you will use to run your G code programs.
I will explain what most of the buttons do and my opinion on how effective the software is at running a hobby cnc machine.
What I won’t be explaining is how to set up the software to run your particular machine. There are so many variables for each different setup it would be impossible to cover them all.
There are pdf files you can download from machsupport that will cover this topic. This link will cover the basics of setting up the software for your application.
If you are unsure of what other hardware or software you need to run a hobby cnc machine you can consult the article ‘How to connect your cnc machine to a pc’ which is another article on this website..
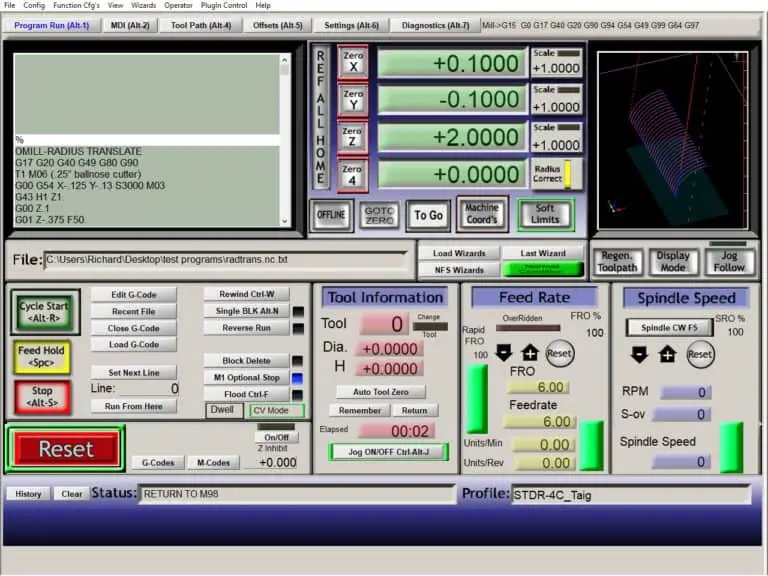
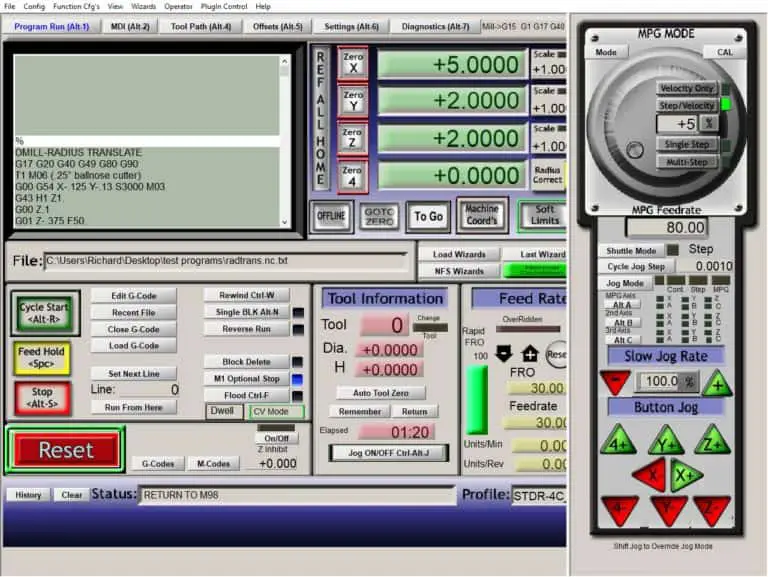
Program Run Screen
This is the main screen you will use when running a program. It contains the most amount of information feedback you will need when monitoring the progress of your program.
Cycle start
The green cycle start button is pretty obvious, press it and the program will run. Depending on what options you have checked in your config file you may have to press it again when it when the program requests a tool change. Also if there are program stops i.e. a “M00”.
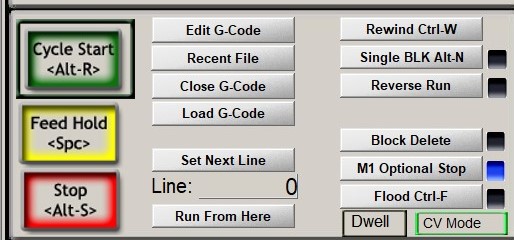
Feed Hold
Feed hold does what it says.
It will stop the motion of the machine while leaving the spindle running and the program still active.
Unfortunately it does not behave how most industrial machines work. When I first used it the machine kept running…. It then stopped later on when it decided it wanted to.
So I consulted the Mach3 manual and this is what it says, “The Feedhold button will stop the execution of the part program as quickly as possible but in a controlled way so it can be restarted by Cycle Start.”
It continues, “When in FeedHold you can jog the axes, replace a broken tool etc. If you have stopped the spindle or coolant then you will generally want to turn them on before continuing. Mach3Mill will however, remember the axis positions at the time of the FeedHold and return to them before continuing the part program.”
This is a handy function to have but it means you can’t just pause the movement of the tool. Pausing the movement instantly is more useful. It enables you, for example, to check for clearance near a clamp or clear away some chip build up.
This, in my opinion, is not good.
Stop
Pressing this stops the program. The spindle and the axes stop moving.
You cannot just press cycle start again to continue running.
This is what I use when testing a new program and it makes a move I was not expecting or it runs really close to a clamp.
The program usually needs to be restarted from the beginning. This usually isn’t a problem if the programs you run are short, which is typical on a hobby mill.
Edit G-code
Pressing this opens up the loaded program in the text editor of your choice so you can make adjustments to your program. The text editor can be selected in the config file section. As soon as you have finished editing, save and close the text editor, and the program will automatically reload.
If you are new to writing G code there are tutorials on this website starting with ‘G code programming for dummies’.
Recent File
Pressing this will bring up a list of the recently run programs.
Close G-code
Pressing this will remove the current program from the software.
Load G-code
Pressing this will open a file explorer window so you can choose your program.
Your G-code programs need to have a “.nc” or a “.tap” file extension.
Just right click on your file and manually change it if it has a “.txt” extension.
Set Next Line
Using this lets you run from a place in the program other than the beginning. The important note to remember is that where you start has to be somewhere that the program is capable of running from. Not just a random place that you hope will work, because if it can’t, it won’t, and the machine is likely to crash.
Run From Here
Run from here is a more capable version of set next line.
It will run through the program from the beginning without physically moving, until it gets to where you indicated.
It then prompts you to manually position the spindle in the correct position so it can continue. This will not work if you are using a subroutine or sub program though.
You have been warned.
Rewind
This button is used to get the prompt back to the beginning of your program. This is not used while the program is active.
Single BLK
This term means single block. When toggled it will tell the software to only run one line of code at a time. The big problem with this is when you toggle it mid program it will run the current line then enter feed hold. This means we then have the same issue with the feed hold function. The machine will just carry on until it finds a “controlled” place to stop. It completely defeats the point.
No machine I have ever run at work in an industrial environment behaves this way.
Pointless.
Reverse Run
This is a function that I have never used. It may be useful with a long program if you have to stop part way through. The idea is to use this in conjunction with feed hold or single block. You can use it to get back to where you wanted to stop initially. I may have to try it and update this article to report on its usefulness.
Block Delete
More commonly known as block skip, which describes its function more accurately. This is a toggle switch that can be turned on or off. It works by forcing the software to ignore any lines of code that have a slash (/) at the beginning of the line.
For example:-
/T1 M06
/G00 G54 X3.3 Y1.8 S2000 M03
/G43 H1 Z1.
/G00 Z.1
/G01 Z0. F2.
/X-1.3 F20.
/Y1.5
/X3.3
/Y1.2
/X-1.3
/G00 Z1.
/M05
G91 G28 X0. Y0. Z0.
G90
M30
With the block delete switched on, all of the lines above with a slash will be ignored and in this example the machine will just home itself and end the program.
Optional Stop
Again this is a toggle switch to turn the function on and off.
With it switched on the machine will stop at a M01 command, basically turning it into a M00 stop command.
Switched off it will ignore the M01 and continue on with the program.
Flood
This toggles coolant on and off, if your machine is equipped with it and if it is controllable.
Most hobby cnc machines are not equipped with a coolant system.
If you are interested in knowing what a hobby machine is capable of I give a general overview in ‘best benchtop cnc milling machine’.
Tool information
This area of the program run screen displays the currently running tool, with its number, diameter offset and its tool length.
This information only displays if you have not selected the option to ignore tool changes.
Most hobby cnc machines do not have tool changers so you may be tempted to make the software ignore M06 tool change commands. But I consider the information to be more important, especially being able to confirm your tool diameter offset.
The only difference it makes not ignoring the tool changes is you have to re-press cycle start when it reads the M06 tool change command.
The ‘auto tool zero’,’ remember’ and ‘return’ buttons are not needed on most, if not all hobby machines.

Jog on/off
This needs to be on to enable you to move the machine manually with the jog function.
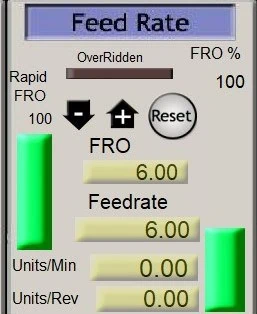
Feed Rate
This section of the program run screen displays the current feedrate. It also gives you the ability to change the feed while you are running a program. Using the arrow keys can speed it up or slow it down.
It will display the current speed and percentage of the current feed compared to the programmed feed.
This is useful when dialling in a new program and testing your feeds and speeds etc.
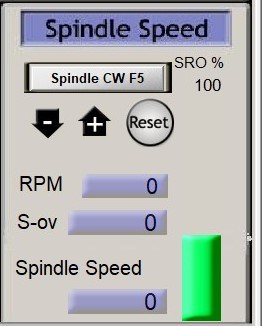
Spindle Speed
This section of the program run screen is used to monitor your spindle. This is not that useful if you do not have a controllable spindle speed like most hobby machines.
The ‘spindle CW F5’ button does come in handy ‘cos you can toggle it on or off to activate the spindle manually.
It bypasses the hassle of typing M03 or M05 in MDI every time you want to manually run the spindle. Pressing F5 on the keyboard has the same effect.
Axis control screen
This is the main screen you want to monitor in conjunction with keeping an eye on what your tool is doing. You can usually get a good idea that the tool is where it needs to be by checking the axis positions on the readouts.
If for example the tool has moved to 1” above the stock , as seen in the readout, but a visual check on the tool tells you it is closer, you can stop the machine and go through a check.
Doing checks like this on every program you run is a good habit to adopt and will help you create your own ‘philosophy’ on running your machine.
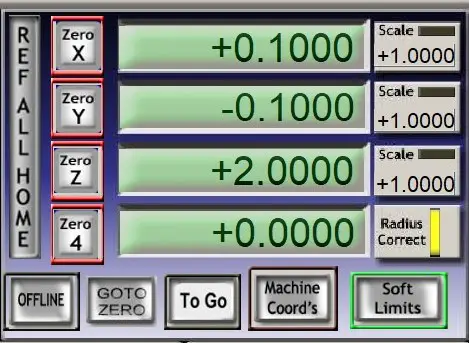
Ref all home
If you have limit switches on your machine and you have them set up as homing switches, you can press this button and your machine will home itself.
If however you don’t have homing switches setup, don’t press this button. Depending on how your software is configured it will move until it locks itself up against the end of each axis travel.
It will ignore any soft limits that have been set. You have been warned.
I have a full explanation on this topic, ‘cnc limit switches – why you don’t need them!’.
Machine coord’s
You can toggle this to switch between displaying the current position referenced from the home position (when lit) and from the active offset position.
Having it displayed with the active offset position is the most effective option when running a program.
Soft Limits
Switch this on (green light) and it activates the soft limit travel boundaries set in the config file.
This is essential to avoid locking the machine up against its axis limits if you don’t have limit switches on your machine.
Offline
Toggling this switch will enable you to run the program without the machine moving and switching the spindle on. I have never needed to use this because when you load a program mach3 will run through the program and display any errors that are in the program.
To Go
This will enable you to display the distance remaining ‘to go’ to the next line of code, kind of like a countdown.
This can be very useful when proving out a new program.
It can enable you to see any potential collisions before they happen.
Zero X, Zero Y, Zero Z and Zero 4
Pressing any of these will zero the axis of the currently active offset. These can be used as a kind of shortcut to zero your offsets when setting up a part.
The display box on each axis is also clickable. You can type in the window any distance you want and it will adjust the active offset.
Not sure this is a good habit to get into though, any changes should be done on the offset page to keep your process as simple as possible.
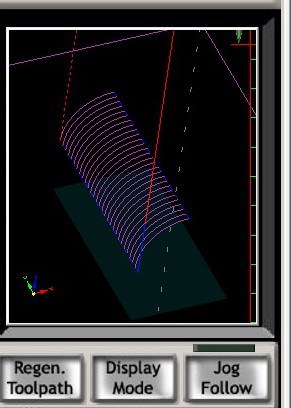
Toolpath Window
This is where the toolpath will draw when you load a program. It will display it initially from above, which is showing X Y view.
If you double click with your mouse inside of the window it will show an orthographic view so you can see X, Y and Z movements.
You can also left click, hold and move your mouse to rotate the view. Right click, hold and moving the mouse will move the toolpath. If you have a wheel on your mouse you can use it to zoom. Alternatively you can shift-left click and drag the mouse to zoom in and out.
The toolpath display is pretty basic, it is there mainly to confirm that the program will run correctly and the software can send the program to your cnc machine.
If you wanted to analyse your toolpaths in more detail you will need to use a G code simulator. I review a couple of free cnc simulators in my G Code Simulator article.
Regen. Toolpath
Click this and the tool path window graphic will be regenerated.
Display Mode
Activating this toggle switch will display a dotted rectangle in the toolpath window. This rectangle represents the soft limit boundary you set in your config file for use with the soft limits function.
This is extremely useful for confirming that the program you have loaded will not hit the limits of your machines travel.
Jog Follow
Checking this option will force the display window to follow the position of the tool as it moves. In other words the tool position will be fixed in the middle of the display.
MDI
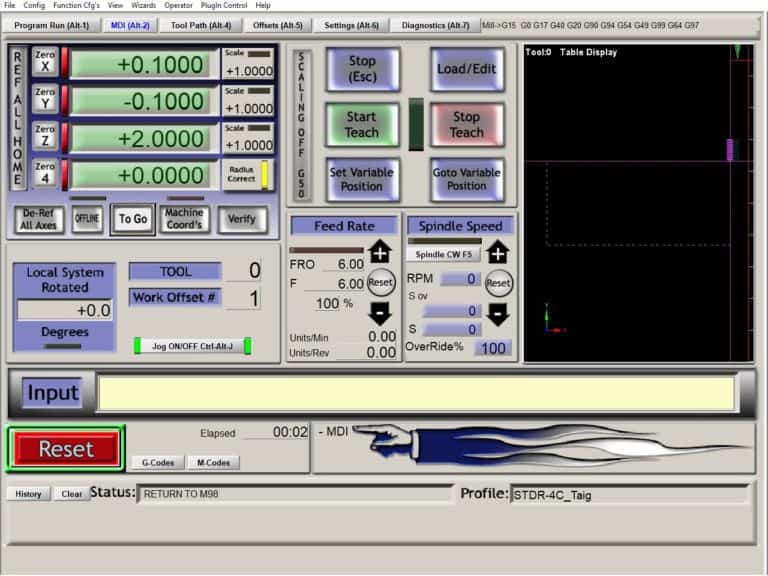
MDI is an acronym for Manual Data Input. It enables just one line of code to be input and executed. It is a quick way to move your machine, switch on the spindle or activate an offset etc.
I find it useful for homing the machine after setting the datum on the piece I am currently working on.
Simply type G91 G28 X0. Y0. Z0. and hit enter on your keyboard and your machine will home itself. The article on this website, ‘G28 G code demystified’ will explain the homing command.
If you need to use the same command again just use the up arrow key and it will display each command you have used in the current session and you can scroll up and pick the one you want to repeat.
The rest of the MDI screen contains a lot of the information and options shown in the Program Run screen.
A few notable exceptions include “start teach” and “stop teach”. These buttons can be used to record your individual lines of code in mdi to create a small program.
This function could be used to create a quick facing program to clean up a blank piece of stock.
You could manually jog the spindle over your workpiece making a note of the positions you need, then recording them in MDI using the teach function to make the program.
Toolpath Screen
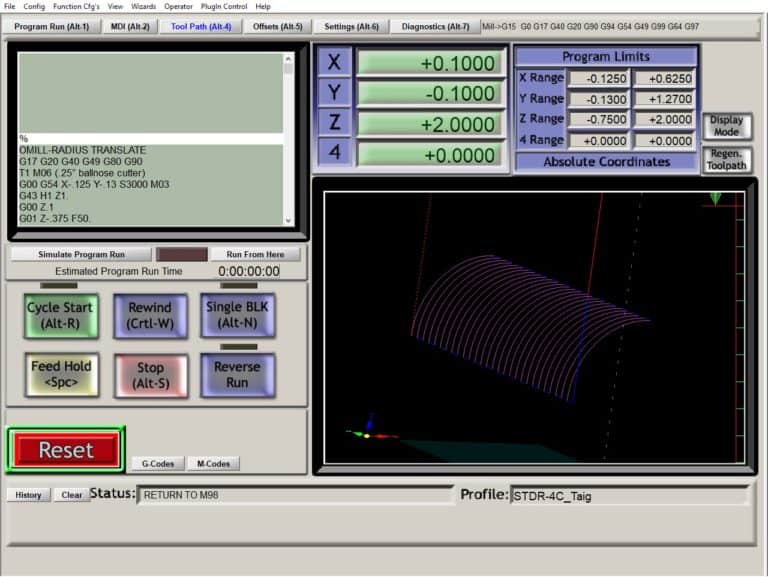
The toolpath screen is very similar to the program run screen but has a much larger toolpath display. This is super useful for checking your toolpath closely, especially if it is quite large and complex. Any issues will be easier to see with the larger display.
A bigger monitor would help as well……
Offsets Screen
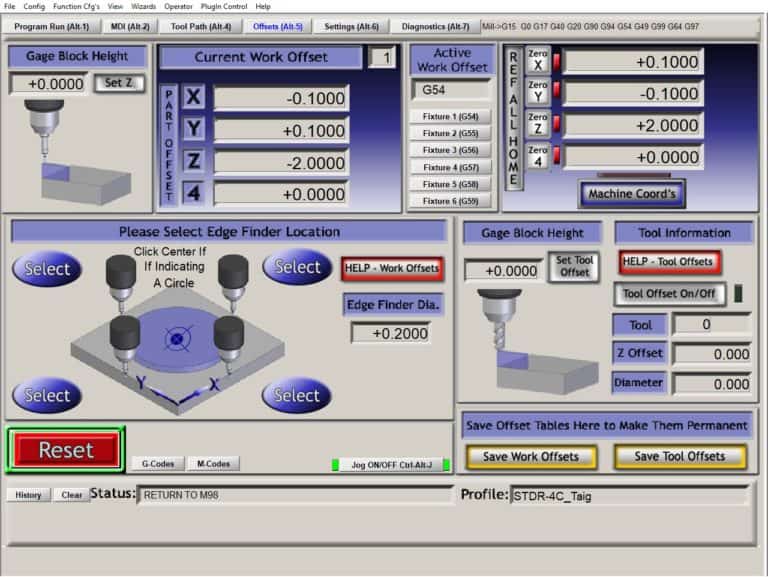
The offsets screen is where you will set and store all the positions that are needed to enable the machine to locate your part accurately. Using an edge finder or dial to locate the stock on your machine and set the values in the offset tables.
I have a tutorial, ‘setting the datums on your cnc machine’, if you need to know more.
Current/Active Work Offset
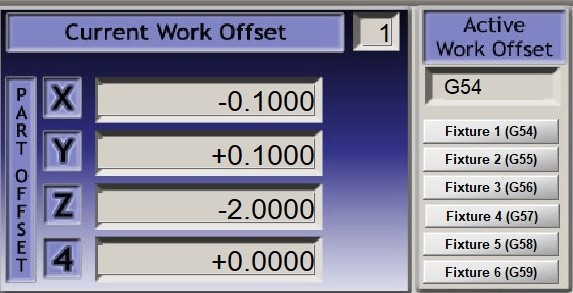
This area of the offsets screen shows you which offset is active and what the offset values are. You can choose to display the six main offsets, G54 to G59, shown in the table as Fixture 1 to Fixture 6.
Whatever offset you select here will not affect which offset is used in a program, this is dictated by the G code in the program you are running.
This table can be used to select an offset for executing a line of code in MDI, for example.
Edge Finder screen
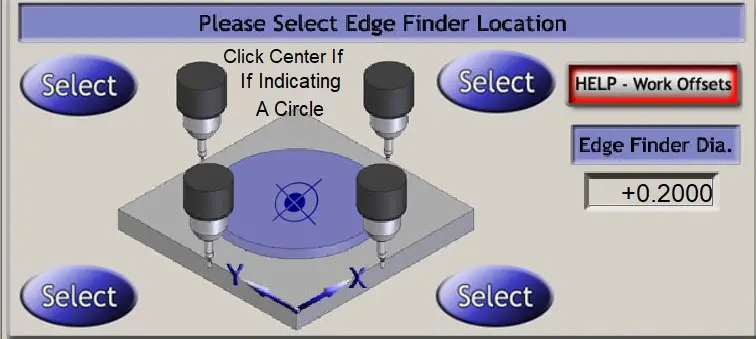
This area of the offsets page is used when picking up a workpiece with an edge finder. The dia of the edge finder is entered into the box, in this case 0.2”. The edge finder is then touched against the edge of the workpiece. Then press the ‘“select” button for the edge you picked up.
The software will set the active offset to that position taking into account the diameter of the edge finder.
This is a more convenient than making a note of the machine offset position and manually typing it into the offset table.
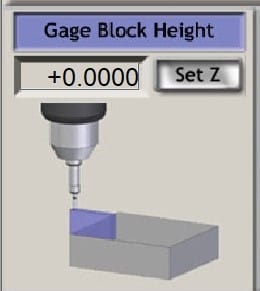
Gage Block Height, Set Z
Using this sets the Z value of your active offset. Touch the tool onto the face you would like to set as your Z datum and press the “set Z” button and it will transfer the value to the offset table.
Type in the height of the block you are using to touch off your tool or spindle and the software will account for it in its calculation.
Gage Block Height, Set Tool Offset
Using this is similar to the set Z option except it will calculate the tool length of the tool you are setting using the current active Z offset.
Touch off the tool and it will measure the difference of its current position against the set Z offset and it will be entered into the tool offset table.
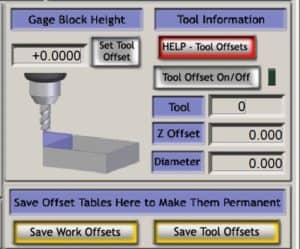
Again, it will take into account the height of the block you are using, as long as you entered it correctly.
You can learn all about setting tools on a hobby cnc machine with ‘Tool Length Compensation Explained’, (another article on this website).
Save Work Offsets / Save Tool Offsets
Selecting one of these will display the associated table, enabling you to directly input or adjust any of your offsets.
Choosing the save tool offsets will enable you to change the diameter of your tool so you can adjust your part dimensions when using a tool dia offset in your programs, e.g. G41 or G42.
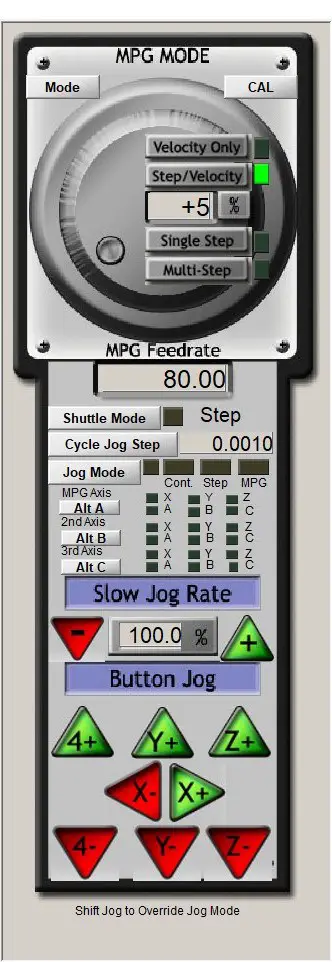
Manual Mode
Pressing the “tab” button on your keyboard will bring up the virtual MPG controller.
This is used to manually move the axes. This function is most commonly used when setting the datums of your current project.
The most used buttons are the green and red jog buttons at the bottom of the MPG screen. Pressing any of these will move your machine in the displayed axis direction. The jog rate can be changed by changing the percentage value above the jog buttons.
One useful function is pressing shift when using the jog buttons. This will force the machine to jog at 100% regardless of what percentage the jog is set at.
Jog Mode
Pressing this button with your mouse toggles through three options, cont, step and MPG.
Cont stands for continuous and enables you to move your axes continuously, just press a direction button and your machine will move.
Toggling the jog mode button to step gives you the ability to move your axes in controlled distances.
Cycle Jog Step
The distance moved is dictated by the cycle jog step button. Pressing the cycle jog step button will toggle through preset distances. These are 0.1”, 0.01”, 0.001” and 0.0001”.
The step mode is used for touching off an edge finder or accurately locating a dial to pick up a part when setting your datums.
Using it will enable you to control the movement accurately so you don’t plow into your part wiping out your edge finder in the process.
To use this function simply select ‘step’ with the jog mode button, choose your incremental movement distance and every time you press a directional jog button the selected axis will move the specified distance once.
If you want an authentic ‘industrial’ experience when manually jogging your machine I highly recommend getting an actual MPG controller.
These are pretty much plug and play and you will wonder how you managed without one after using it for a short time.
Mach3 keyboard shortcuts
If you prefer to use your keyboard to control your cnc machine instead of clicking virtual buttons, there are keyboard ‘hotkeys’ for most of the running functions. Looking at the screens, if there is a keyboard hotkey for that button it will show it on the button.
The arrow keys can be used to jog the machine in the X and Y axes, with the page up and page down used for the Z axis.
For some functions such as cycle start, the keyboard shortcut requires two keys to be pressed. This provides some built in safety, meaning the machine is unlikely to start operating if you accidently lean on the keyboard. One thing to note, the shortcuts are displayed as capitals, you do not have to use caps lock, a lowercase letter works.
- Cycle Start = Alt-R
- Feed Hold = Space Bar
- Stop = Alt-S
- Rewind = Ctrl-W
- Single Blk = Alt-N
- Jog on/off = Ctrl-Alt-J
- Spindle on (CW) = F5
- Left Arrow = Jog in -X direction
- Right Arrow = Jog in +X direction
- Up Arrow = Jog in +Y direction
- Down Arrow = Jog in -Y direction
- Page up = Jog in +Z direction
- Page down = Jog in -Z direction
There are also Hotkeys for changing to different screens
- Program run = Alt-1
- MDI = Alt-2
- Tool Path = Alt-4
- Offsets = Alt-5
- Settings = Alt-6
- Diagnostics = Alt-7
Final Thoughts and Opinion
I’ve been using Mach3 for a while now and it is excellent software that justifies the cost.
It isn’t perfect, but it is designed to be used with many types of cnc machine so compromises are probably unavoidable.
Once it was setup for my machine it has never crashed and caused any issues. I would recommend it to anyone wanting a hobby cnc machine, the only choice you should have is what type of cnc machine to run it with.
I also have a tutorial for Candle Grbl software, which is a free download. This machine control software is used with arduino based hardware which is not compatible with Mach3. I use Candle with my 3018 cnc engraver for small craft projects.
If you are looking to learn how to create G Code programs to run in Mach3 or similar software, hit the link below to read my tutorial on creating G Code from SVG files.


